Entering an Invoice
![]()
To Enter an Invoice
-
Click Invoices
 from the Button Bar, click New |
Bill
from the Button Bar, click New |
Bill -
or from the Upper Menu, click Purchasing | Invoices | New - Bill
-
Enter in the Supplier and Invoice information. See Invoice Information descriptions below.
 Notice when you
select a supplier, the list on the left is populated with all the
items and package sizes that you have set up for that supplier.
Notice when you
select a supplier, the list on the left is populated with all the
items and package sizes that you have set up for that supplier. -
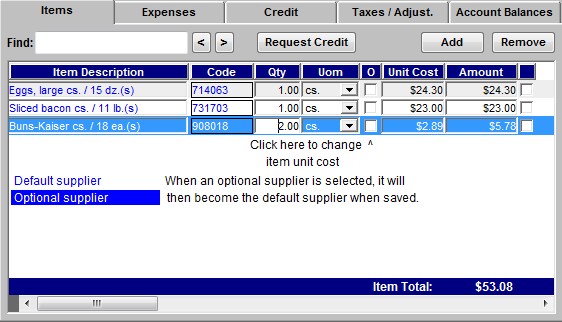
Select the Items for the invoice.
You can select items a few different ways:• Scroll down the list and click and drag the Item and drop into the purchase list.
• Click into the search box and begin typing the name of the Item, the list will shorten as you type. Double click on the item. It will display in the purchasing list.
• Click into the search box and type the order code of the Item, the list will shorten as you type. Highlighted the item, press Add.
-
Enter in the Qty (Quantity) of the received item.
-
Select the UOM (Unit of Measure). The are two choices available, the Purchase Unit size and the Case Unit size.
The default unit
of measure is the purchase unit that you indicated in the Items windows during
the initial setup. -
Optimum Control will automatically enter the current Unit Cost for this item/supplier.
Compare it to the Unit Cost on the invoice. If there has been a price change, type in the new price or type in the total in the Amount field. -
If the item price has changed, a check mark will automatically be placed in the (O) Price Override box. This will allow you to override the unit cost applied to this item.
-
Enter in Taxes/Adj, Credits and Expenses as required.
-
Ensure that the Invoice Totals balance.
-
Click Save and
-
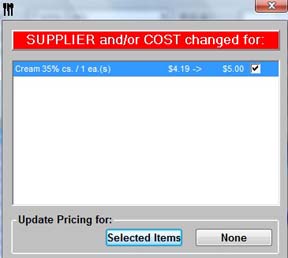
If prices have been changed, you will receive a window allowing you to Update Pricing for Selected Items. If the price change is permanent, check the box. This will update the recipe costing. If it is a one time change, do not select the box. The recipe cost will not be affected.
Invoice Information
Supplier – Select the supplier who the Bill/Credit is from. If the supplier is not listed, See Adding Suppliers
Invoice Date – Select the date of the invoice from the drop down box.
Invoice # – Enter the supplier Invoice/Credit number. Check this carefully to make sure it is entered properly.
Invoice Total - Enter the total amount of the invoice
including all charges (items, expenses and taxes). ![]() This
total is usually located at the bottom of the last page of the invoice.
This
total is usually located at the bottom of the last page of the invoice.
PO # - Purchase Order Number - Enter a Purchase order number if you use them. If you have imported your invoice from a pending order, the Purchase Order number will appear automatically.
Due Date - This field is calculated by the program. This is the date that the bill is due to be paid depending on the Terms that are selected.
Terms- Select the terms of payment that you have with this supplier. This field is optional, if you do not wish to use it just TAB to the next field.
Comments - Enter additional notes about the invoice/credit.
Item Entry – Double click or Drag and Drop the inventory items from the invoice from the list to the item area on the right.
Receive Order - This will display all Pending Orders, double click on the pending order to load into the Invoice window.
Print - Prints the Invoice.
Load Template - Load a saved Invoice Template.
Save Template - If you do not create an order, you can make an Invoice template for purchased items. Another use is if you want to save an Invoice that is not complete. Click Save Template, Type in a name and click OK. Click Load to open the incomplete Invoice, complete the invoice and click Save
Additional Notes
-
If you do not find the item you are looking for on the list, the supplier has not been set up for the item selected. While still in the invoice window, click on Items
 from the Button
Bar, select the item and click on the Addition Suppliers or Case Sizes
button. Set up the information about this item for this supplier and
click Save and Close. The item will appear on the
list in the Invoice window. You can also add a new pack size for a
supplier from the Item window.
from the Button
Bar, select the item and click on the Addition Suppliers or Case Sizes
button. Set up the information about this item for this supplier and
click Save and Close. The item will appear on the
list in the Invoice window. You can also add a new pack size for a
supplier from the Item window. -
When you save an invoice, all the items that the supplier was the alternate for, are now indicated as the default (as this was the last supplier that you bought these items from).
-
If you have purchased a part case, you can enter a decimal value of the case.
E.G. If the case UOM contains 12 cans and you ordered 6 cans, enter .5 as the QTY.