Item Storage Locations
![]()
In Optimum Control, Inventory and Ordering Sheets can be sorted by Location. To sort by Location, you must enter your Storage Locations first.
![]() First time users, you will note that we have
included default Storage Locations. You can edit or delete these as you see
fit to accommodate your operation.
First time users, you will note that we have
included default Storage Locations. You can edit or delete these as you see
fit to accommodate your operation.
To Add a New Location
-
From the Upper Menu, click on Setup | Storage Locations
-
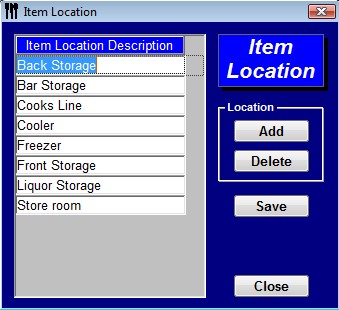
The Item Location window will open.
-
To add a new location, click Add
-
Type in the name for the new location in the line provided. You can get as specific as you like with this window, perhaps you have a large cooler and you want to break up your count sheets. In this case you may wish specify cooler-west wall or cooler-north wall.
-
Click Save.
-
If you wish to add any more locations, repeat steps 3 and 4.
To Edit a Location
-
From the Upper Menu, click on Setup | Storage Locations.
-
Choose a Location from the listing.
-
Type in the new Location Description.
-
Click Save and Close.

![]() You can choose locations for your Inventory Items in the
Items and Prep windows, but also in the Inventory Level
Management window or by right clicking in the
Select Items Window.
You can choose locations for your Inventory Items in the
Items and Prep windows, but also in the Inventory Level
Management window or by right clicking in the
Select Items Window.
To Delete a Location
-
Highlight the Location and click Delete.
-
You will be prompted Do you really want to delete 'location'.
-
Choose Yes.
-
Click Save and Close.
![]() You can only delete locations that are
NOT listed as a Primary Locations for
any Inventory Items. If they are, you need to change the primary
location for those Inventory Items. Secondary Locations will be deleted from the
listing.
You can only delete locations that are
NOT listed as a Primary Locations for
any Inventory Items. If they are, you need to change the primary
location for those Inventory Items. Secondary Locations will be deleted from the
listing.
 Locations-Secondary