Adding or Editing Inventory Items
![]()
To Add or Edit Inventory Items
-
Click Items
 from the Button
Bar or from the Upper Menu, click Inventory | Items
from the Button
Bar or from the Upper Menu, click Inventory | Items -
From the Select Item window, click New.
-
Enter Item information in the fields. See Item Information descriptions below.
-
Click Save and Close.
![]() If there are items, E.G. bottled beer,
where the Supplier, Purchase price, Location and Recipe unit are the same, click
Duplicate. Duplicate keeps all the information except for
Description, Order Code and Barcode. This allows for easy entry of similar
items.
If there are items, E.G. bottled beer,
where the Supplier, Purchase price, Location and Recipe unit are the same, click
Duplicate. Duplicate keeps all the information except for
Description, Order Code and Barcode. This allows for easy entry of similar
items.
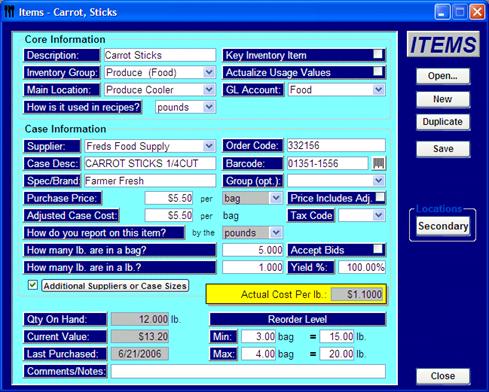
Item Information
The ITEMS window is broken into three sections:
-
Core Information
-
Case Information
-
Summary Information
Core Information
Description (Item Description) - Enter in the name of the item you purchase.
E.G. Ground Beef, Buns - Kaiser, Ketchup, etc.
To group your products for easy selecting, type in multiple sized or typed products like this:
E.G. If you use Hamburger, Kaiser and Hot Dog buns, enter in each description as follows:
Buns-Hamburger Buns-Hot Dog Buns-Kaiser
Inventory Group – Select the reporting group (Inventory Group) for this item. See Item and Product Groups
Main Location (Primary Storage Location) - From the drop down list choose the location in which you keep most of this inventory. For the most part this would be the location that you order from. You can add as many storage locations for this item as you wish by clicking the Locations – Secondary button
See Also Item Locations
How is it used in recipes? - This is the recipe unit of measure. we suggest that you enter items to the smallest unit you can, just gives a little more flexibility when entering items and counting stock. Rule of thumb to use is recipe unit broken down to Fluid ounce (or ml) for volume measured items, ounce (gram) for weight measured items and each for items used individually.
Examples:
-
Vodka is purchased by the bottle but used by the ounce in recipes, select fl oz as the Unit of Measure (UOM)
-
Bread is purchased by the loaf but used by the slice in recipes, select slice as the UOM
-
Tomato paste is purchased by the case but used by the ounce in recipes, select ounces as the UOM
You can add new Units of Measure at any time. See Adding Units
of Measure ![]() This decision is important
as all the data in the program will be tracked by this unit
This decision is important
as all the data in the program will be tracked by this unit
Key Inventory Item - Check off this box if you would like to count this item every time you enter inventory counts. There are some Key items that you will want to count every time and others that you will only want to count once in a while (garlic powder, stir sticks, etc.). If you don’t want to count this item every time, uncheck this box.
This feature helps when tracking Key items. You may have 500 inventory items but only want to track 75 on a weekly basis. This feature allows for you to only see the items that you wish on the Inventory count sheets and in the Inventory window.
Actualize Usage Values – Some items you just cannot track properly in a recipe, for example, fryer oil, napkins, straws etc. These items may not be used in any recipes but the usage is calculated, unfortunately Optimum Control will show a variance because there is actual usage but no ideal.
What this function does is allows you to tell Optimum control usage reporting that whatever you actually used for this item, is what you should have used…no variance.
E.G.
-
Fryer Oil – Every week you change your fryer oil. You have an opening inventory of 4 pails, you purchase 10 pails and end up with 2 pails for an actual usage of 12 pails. The usage report will show an actual usage of 12 pails but no or very little ideal usage (depending if it is contained in any recipes) so you would have a variance in your overall food cost of the value of 12 pails of oil. If you have selected Actualize, the actual usage would be listed as the ideal usage and no variance would be listed. Each item that is actualized will be marked with a * next to the ideal usage amount.
-
Sugar Packets – In recipes you have included a couple of sugar packets but different people take different amounts. Optimum Control may calculate an ideal usage of 2 cases but you actually used 3.5 cases. In this case you have a variance of 1.5 cases even though it’s not really short, so if you Actualize Sugar Packets, the actual usage will match the ideal usage.
GL Account - GL Accounts are the names of the accounting groups or Chart Of Accounts that you want an item to appear under in the General Ledger report. These names should coincide with the ones in your accounting software.
E.G.
-
Inventory is an Expense and usually goes under Cost of Sales or Food. Check with your bookkeeper or accountant before proceeding if you are unsure. It should be the same account as where this type of item appears in General Ledger section of your accounting system. See Chart of Accounts
Case Information
Supplier – Choose the supplier or one main supplier for this item. If the Supplier is not set up, See Adding Suppliers
Order Code – Enter the supplier’s order code for the item. This may also be called the item code.
Case Description (Optional) - In some cases, especially if you are planning interfacing to supplier bidding, you may want to indicate the supplier description. This description will appear on order sheets and will be sent to the supplier.
Barcode - Enter in the barcode for this item. If you have a scanner, you can scan the item barcode and it will place the code into the field. Alternatively, you can generate your own barcodes, this gives you the option to generate labels for your shelves that OCMobile for Pocket PC scanning can utilize.
Spec/Brand (Optional) - Specify a brand name E.G. Heinz, AAA Angus Beef etc. If you are using bidding, this will let the supplier know what brand you want pricing on.
Group (Optional) - Select an inventory group for this item.
Purchase Price - Enter in how much you pay PER unit of measure. E.G. You pay $23.00 per Case or $5.99 much per Pound.
Price Incl Tax Grp. – Most food items will not have a tax group, but in the case of alcohol or cleaning supplies, tax or discounts may be included in the price. You can select to include this tax to adjust the amounts automatically in the invoice window when purchasing.
Tax Grp - If this item includes taxes or discounts in the price, select the tax group you want to assign. See Taxes and Tax Groups
How do you report on this item? – This is for reporting
and inventory counting purposes. Do you report this item by the can, pound,
package etc.
E.G. You purchase the item by the case,
the case contains 6 cans. During inventory you count the item by can.
How many (tracking units) are in a (purchase unit)? – How many cans in a case, how many packages in a box, how many pounds in a pound etc.?
How many (recipe units) are in a (tracking unit)? – How many fl. ounces in a can, how many packages in a package, how many ounces in a pound etc.?
Accept bids? – Leave this checked if you want to receive bids on this item. You can also check this feature in the item selection edit window. See Bids
Yield % – If you decide to use this feature, enter the yielded percentage that you end up with when using this item. See Item Yield Factor
Actual Cost Per unit – The yellow box will show the actual factored cost of the recipe unit.
Summary Information
Qty on Hand – Displays the current qty on hand in the units that you selected that you wanted to track this item in. This number is only right if you are tracking per day and have all sales mixes and invoices entered.
Current value – Displays the value of the current Qty on Hand.
Last Purchased - Indicates the last date this item was purchased. Once you start using the purchase features of the software this field will be automatically displayed.
Reorder Level - Select the minimum and maximum order
levels. Enter either the
purchase unit or the case unit, you ill notice that any conversions are done for
you. You can also set the reorder levels in the Inventory | Inventory
Level management window. See Inventory Level
Management
You can use Optimum Control to generate a suggested
order sheet based on par levels. To use this feature, click
Purchases | Order Reminder. A list will be displayed of
all items that are below minimum Par levels according to the qty on
hand. If you do not have all your information up to date then this
information will not be accurate so be careful when using this tool.
Comments/Notes – Add additional notes if required.
 Item Examples